세상에는 수없이 많은 워드프레스 플러그인이 있지만, 한국 웹사이트에는 꼭 있는 기능을 찾기 힘든 있는 경우가 있습니다. 바로 플러그인의 주 배포자가 서양의 개발자들이기 때문인데요, 한국의 팝업창에는 꼭 있는 하루동안 이 창 보이지 않기도 그런 기능 중 하나입니다.
오늘은 무료 팝업 플러그인의 하나인 Popup Builder 플러그인을 편집해 하루동안 이 창 보이지 않기 기능을 추가해 보겠습니다.
Popup Builder 플러그인
Popup Builder 플러그인은 무료 버전과 PRO 버전이 있지만 무료 버전도 꽤나 사용하기 편리하게 만들어져 있어 일반 사용자 분들이 사용하기에 좋은 플러그인입니다.
Popup Builder 플러그인 사용법 보기
먼저 Popup Builder 플러그인 설치 후 javascript 폴더의 sg_popup_frontend.js 파일을 편집합니다.
edit plus, 이클립스, 앱타나 스튜디오 등을 이용하여
‘/wp-content/plugins/popup-builder/javascript/sg_popup_frontend.js’ 파일을 에디터에서 엽니다.
파일 내에서 “onOpen”이라고 검색하면 221번째 줄에서 “onOpen”이 포함된 코드를 찾을 수 있습니다.
1. 아래의 코드를 복사하여 jQuery("#sgcolorbox").addClass('animated '+popupEffect+'');의 아랫줄에 붙여넣기 합니다.
/*Custom*/

jQuery('#sgcboxContent').append(

'<form name="notice_form" class="chk_form" style="width:80%;position:absolute;bottom:0;">

<input type="checkbox" name="chkbox" value="checkbox" />

<label>하루동안 이 창 보이지 않기</label>

</form>');

/*@Custom*/
2. 아래의 코드를 복사하여 onComplete: function(){ ... }의 아래, html: popupHtml,의 윗줄에 붙여넣기 합니다.
/*Custom*/onClosed: function(){closeWin();},/*@Custom*/
3. 완성된 코드는 아래와 같습니다. (218번 줄부터)
SG_POPUP_SETTINGS = {

			width: popupWidth,

			height: popupHeight,

			onOpen:function() {

				jQuery('#sgcolorbox').removeAttr('style');

				jQuery('#sgcolorbox').removeAttr('left');

				jQuery('#sgcolorbox').css('top',''+that.initialPositionTop+'%');

				jQuery('#sgcolorbox').css('left',''+that.initialPositionLeft+'%');

				jQuery('#sgcolorbox').css('animation-duration', popupEffectDuration+"s");

				jQuery('#sgcolorbox').css('-webkit-animation-duration', popupEffectDuration+"s");

				jQuery("#sgcolorbox").removeAttr("class");

				jQuery("#sgcolorbox").addClass('animated '+popupEffect+'');

				/*Custom*/

jQuery('#sgcboxContent').append(

'<form name="notice_form" class="chk_form" style="width:80%;position:absolute;bottom:0;">

<input type="checkbox" name="chkbox" value="checkbox" />

<label>하루동안 이 창 보이지 않기</label>

</form>');

/*@Custom*/

				jQuery("#sgcboxOverlay").addClass("sgcboxOverlayBg");

				jQuery("#sgcboxOverlay").removeAttr('style');

				if (popupOverlayColor) {

					jQuery("#sgcboxOverlay").css({'background' : 'none', 'background-color' : popupOverlayColor});

				}

			},

			onLoad: function(){

			},

			onComplete: function(){

				jQuery('#sgcolorbox').trigger("sgColorboxOnCompleate",[pushToBottom]);

				/* Contact form 7 */

				if(jQuery('div.wpcf7 > form').length) {

					jQuery('div.wpcf7 > form').wpcf7InitForm();

				}

				if(popupWidth == '' && popupHeight == '') {

					jQuery.sgcolorbox.resize();

				}

				jQuery('.sg-popup-close').bind('click', function() {

					jQuery.sgcolorbox.close();

				});

			},

			/*Custom*/onClosed: function(){closeWin();},/*@Custom*/

			html: popupHtml,

			photo: popupPhoto,

			iframe: popupIframe,

			href: popupImage,

			opacity: popupOpacity,

			escKey: that.popupEscKey,

			closeButton: that.popupCloseButton,

			fixed: sgPopupFixed,

			top: that.positionTop,

			bottom: that.positionBottom,

			left: that.positionLeft,

			right: that.positionRight,

			scrolling: popupScrolling,

			reposition: popupReposition,

			overlayClose: that.popupOverlayClose,

			maxWidth: popupMaxWidth,

			maxHeight: popupMaxHeight,

			initialWidth: popupInitialWidth,

			initialHeight: popupInitialHeight

		};
4. 아래의 코드를 복사하여 96~98번째 줄의
SGPopup.prototype.sgShowColorboxWithOptions = function() {

	var that = this;

	setTimeout(function() {
의 바로 아랫줄에 붙여넣기 합니다.
/*Custom*/if ( document.cookie.indexOf('maindiv=done') > 0 ) return;/*@Custom*/
5. 마지막으로 아래의 코드를 복사하여 문서의 맨 윗줄에 붙여넣기 합니다.
function setCookie( name, value, expiredays ) {

    var todayDate = new Date();

    todayDate.setDate( todayDate.getDate() + expiredays );

    document.cookie = name + "=" + escape( value ) + "; path=/; expires=" + todayDate.toGMTString() + ";"

    cookiedata.indexOf(document.cookie)

   }

function closeWin() {

    if ( document.notice_form.chkbox.checked ){

        setCookie( "maindiv", "done" , 1 );

    }

}
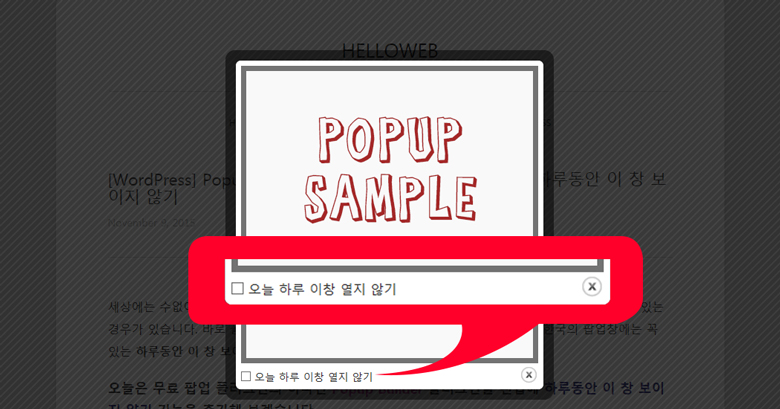
모든 설정이 완료된 후 쇼트코드를 입력한 페이지를 보면 아래 그림과 같이 ‘하루동안 이창 열지않기’기능을 가진 팝업이 나타납니다. 🙂
